Quick guide to import images and videos on the WebApp
Applies only to All Twinkly PRO devices.
[this feature is not available for Twinkly Plus and for Twinkly]
Import Tool is the feature that allows you to bring in your Gallery, images, and videos that can be screened on your installation.
You can upload any visual content, whether it’s an image from your gallery or a YouTube video.
In the Gallery section, click on All Effects and then on the Upload button, as the image below
.png?width=688&name=1%20(4).png) In the following screen, you have to first choose the name of your new content, and then click on Browse to choose the content you want to upload, and then double click on it to open, and once selected, click on the Save button.
In the following screen, you have to first choose the name of your new content, and then click on Browse to choose the content you want to upload, and then double click on it to open, and once selected, click on the Save button..png?width=688&name=2%20(3).png)
.png?width=688&name=3%20(3).png)
.png?width=688&name=4%20(2).png) Once uploaded, the effect will be available in the Gallery, in the Custom section.
Once uploaded, the effect will be available in the Gallery, in the Custom section.
.png?width=688&name=5%20(2).png)
To install your content, just click on the Install Button you see in the image above, and then choose the Object or Installation you want to apply your content to, tapping finally on the Install button.
The app will then alert you with a message when the installation is complete.
.png?width=688&name=6%20(3).png)
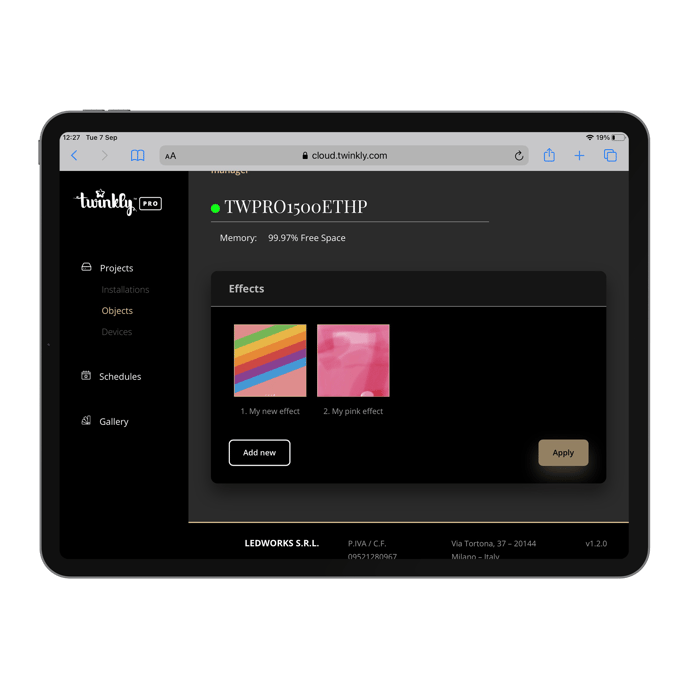
To finally apply your new content, select Objects, from the left side menu, and choose the object you want to apply the effect on.
Then scroll down to the Content Manager and click on the “manage” button.

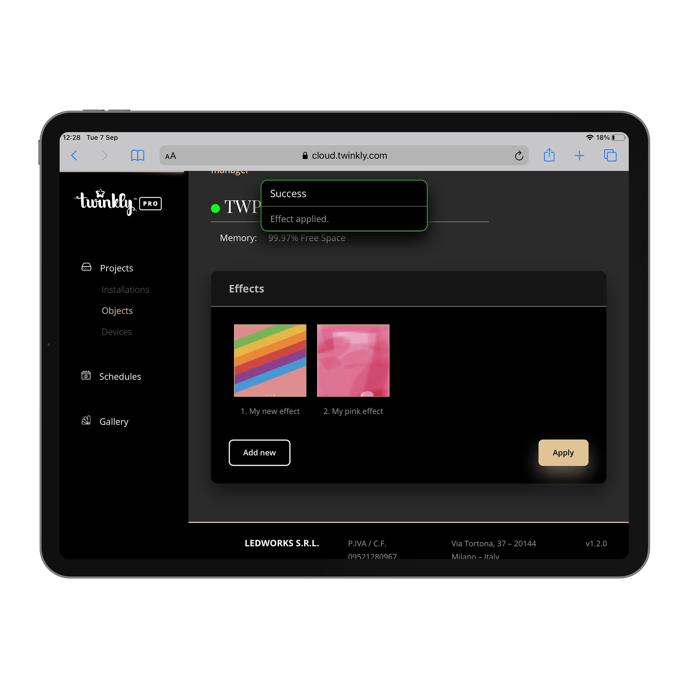
Once the effect has finished its installation (be sure to wait until the end of the process, you will see the upload percentage) select the effect, and then click on the Apply button, and wait for the Success pop-up.

If you want to see if the effect is playing correctly, also remotely, browse back to Objects and check the Currently Playing section.
Every time you want to upload a video or an image ad play it on your installation, just follow all the steps above for each content, just remember to take a look at the percentage of memory left!
Technical specification
Formats:
-
Image: JPG, PNG, TIFF, GIF
-
Video: MP4, AVI, FLV, MOV, MPEG
File Weight:
-
Image: There is no limitation to file weight.
-
Video: 100 Mb
Resolution (Pixel Density):
The resolution of the image/video should always be the number of lamps of your installation, for example in a case with 1000 lamps in width and 250 in length, the image/video should be 1000x250 pixels. This is to ensure the highest fidelity between what you see on the screen and what you’ll see on your installation.
Ratio:
The ratio is visible when entering the installation or object.
In the layout section you will find the entry: Surface aspect ratio: (value): just click on the "i" that will appear on mouseover to read the indication recommending the size in pixels of the image or video to be uploaded.
Please note that when accessing the Twinkly Web App using an account assigned the Guest role, certain functionalities are restricted. For instance, Guests are unable to upload new effects, though they retain the capability to modify effects from those already stored. Furthermore, Guests possess the ability to toggle lights on and off, as well as adjust brightness settings. For further details on the roles and permissions associated with Twinkly users, we encourage you to review the article titled "What are the roles you can assign to a Twinkly user?" This resource provides comprehensive information to help you better understand the capabilities and limitations of different user roles within the Twinkly ecosystem.
Not found what you were looking for? Contact us.
